Contact Me

thirteenravens@yahoo.com

Monday, December 20, 2010

Beautiful Queen Kat Designs Stamps!!!


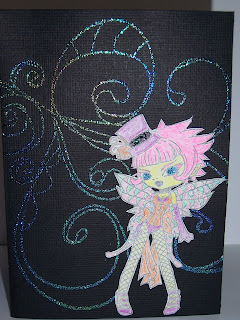
Oh my goodness…I have found some amazing new stamps!!! I can not tell a lie, I am in love with these stamps. I have been looking for stamps that were a little more “me” and I have found them at Queen Kat Designs! As soon as these were delivered I had to use them. I have a cousin who loves fairies, mermaids, and mythical creatures as much as I do so of course I had to make her some cards. I used black “American Crafts” cards and instead of paper piecing the front I decided to heat emboss a large flourish. I used the Fancy Pants’ “On a Whimsy” stamp with Versamark “Dazzle” and Psychedelic embossing powder to keep the front simple yet whimsical. I really didn’t want anything to take away from the beautiful stamps. The lovely ladies on the front of the cards are Queen Kat Designs’ “Victoria Mermaid” and “Cabaret Fairy” and you know they’re wearing Stickles in “Diamond,” “Turquoise,” and “Lime Green.” Ok, I could go on and on about these stamps but I think I’m going to make me some cards too.

Saturday, December 18, 2010


My niece loves to write and she loves anything with her name on it so I made her a little set of cards for part of her Christmas. I used Hero Arts “Woodland Creatures,” Studio g “Series 28,” Technique Tuesday “Beautiful Day,” Inkadinkado “Doodle Alphabet,” Recollections “Alpha Dot,” Tombow markers and Stampendous “Detail Clear” embossing powder. You know I love that stuff! I also had to use Ranger Stickles “Diamond.” Ok, creativity is following me around today so I’ve got to go make something. Bye.

Friday, December 10, 2010


Hey, I’m so busy getting ready for the holidays that I felt the need to stop and smell the flowers. I thought you might need to also, so…here is a cute little vase that I did using Cricut Lite’s “Botanicals.” Hope you enjoyed your quick “flower break” I know I did. Now back to work for me.

Wednesday, December 8, 2010

A Long Tile


I love my Cricut! I’m always trying to find new things to do with it. Sooo for Christmas last year I made my parents a tile for their house. I just used a tile from the local hardware store and then played around with my Cricut and some vinyl. You can use any size and color tile you want! I like to add a piece of foam on the back of the tile just to give it a finished look. Add an easel and you’re done. What a great personalized gift for anyone on your list; it’s so quick and easy. For this tile I used Cricut’s “Graphically Speaking,” “Opposites Attract,” “Plantin Schoolbook,” “Ashlyn’s Alphabet,” and “Serenade.” Let me know what you’re doing with your Cricut for Christmas. I can’t wait to see your creations.

Tuesday, December 7, 2010

Key to my Heart


I needed a birthday card for my better half and I wanted something a little different. So I started with a blue Creative Café card on which I stamped Hero Arts Clings “Aged Print Frame” with Color Box black ink. I also heat embossed it with Stampendous “Detail Clear” embossing powder. This is probably my favorite embossing powder ever! I painted a Maya Road Chipboard “Antique Key” with Tattered Angels Glimmer Glam “Stiletto” and used Studio g’s “series 11” Happy Birthday to stamp on the tag. For the inside I went a little crazy with Tattered Angels Glimmer Mist in Crème de Cocoa, Jazz Blue, and Graphite. I also stamped the envelope front with the “Aged Print Frame.” This is a simple, but not plain, card that is pretty quick to make yet still has a lot of personality. I call it my clean-grunge look or maybe my grungy clean look. Oh well, whatever you want to call it…I like it.

Wednesday, December 1, 2010


It’s that time, new month…new calendar. This month I was on a Stampendous snowman kick. I used their “Mini Snowman,” “Winter Family,” and “Snowflake Symphony.” The “Merry Christmas” was from 4Klear “Season’s Greetings.” And of course Heidi Swapp’s month stamps. Since this is as close to snowmen that I’ll get here in Alabama I plan to enjoy them all month. Those of you who get real snow, enjoy it enough for me.

Thursday, November 11, 2010

What a call!


We recently repainted my craft room in green and orange and I really wanted an orange phone for it, trust me they are not easy to find. So we went to see my parents and in my step-dad’s garage he had an old rotary phone…it was orange and it worked!!! I had never even noticed it. He let me bring it home and of course I had to play with it a little. So I used rub-on transfers from Me & My Big Ideas’ “Decorative Ornaments” and the fly rub-on by Tinkering Ink “Blur/Cake.” I love it and it is sooo perfect for my room. Let me know what “everyday” item you have made into your own piece of art.

Friday, November 5, 2010

November


I love this plain desk calendar from Mead that I can decorate myself! For this month I used…
Stamps from Heidi Swapp month stamps, Inkadinkado’s “Fall Season,” Inkadinkado’s “Harvest Assortment,” studio g’s “series 20 and 34,” and Autumn Leaves’ “Fall in Love” and “Scarecrow.” Color Box Mini Black, Tsukineko’s Brilliance Pearlescent Chocolate, and Tsukineko’s Versa Magic Gingerbread were the perfect inks for this project. Add a little color with some color pencils and you're done. I hope you are adding a little “art and crafts” to your days! Tell me about it.

Thursday, November 4, 2010

Pumpkins!


A little vinyl, a Cricut machine, a few pumpkins and some time to kill will give you some cute decorations with no mess. I used “Plantin Schoolbook,” “Opposites Attract” and “October 31st.” I love the bat as an apostrophe and the raven perched on the “L” on the “Long’s pumpkin.” And while spiders are far from my favorite creature I’m afraid I’ve gotten very attached to this one.

Wednesday, October 6, 2010

"Stamped" Candles


Ok, these “stamped” candles are so cute I had to make some just for me. However, I also make them for quick gifts anytime I need one. Most people enjoy getting candles and getting one that has been personalized just for them makes it extra special. These are also great for weddings, just monogram them for the happy couple in the wedding colors.

I used Inkadinkado’s “Halloween Trails,” Stampendous’ “Swirly Owl,” and Hero Art’s “Scroll Tree,” but you can use any stamp you have. I colored the owl with markers but you can also use colored pencils. All you need is some white tissue paper, a heat gun (and of course I use Ranger’s “Stickles”) for an original gift for your one of a kind friends.

Saturday, October 2, 2010

Anniversary Mini Album


I don’t like having my picture taken so when I made this mini album I decided to use music instead of pictures. Each page has a quote from a song that means something to us and a few words about why that song is special. There is a paper disc holder fastened to the back page with a cd of all the music used in the book.
The paper I used was Cosmo Cricket’s “Love Notes.” This is one of my all time favorite papers. I printed everything on my computer and then just rubbed an ink pad across the white cardstock to add a little color. On the front cover I stamped the flourishes with a stamp from the “Pollen Dust” stamps. Inside I used Prima “Obsession” flowers and various bling. On the tabs of the album I stamped “I’ “love” “you” with Hot Off the Press “Artsy ABC’s.” The back cover was stamped with Inkadinkado “Fall Season” tree and Scrappy Cat “Inspirations.” Of course I also used Ranger’s “Stickles” in Diamond. Hope this gives you some ideas for albums that don’t use pictures…just use your imagination. And let me know what you come up with.

Thursday, September 30, 2010

Christmas Cards


Since tomorrow is the first day of October it’s time for me to start thinking about Christmas cards. These are the cards we sent out last year. I saw a scrapbook page that was laid out with cut strips and loved the idea so much I borrowed it for our cards. For the base of my cards I bought plain white cards, of course you can use any color you like.
1. Cut a piece of cardstock 4x6
2. I used five pictures but you can use as many as you like. Cut them in strips for the so that the part you like is in the strip.
3. Using a dry adhesive place your pictures onto your 4x6 cardstock. Cut off any of the picture that hang over the cardstock. Then make as many copies as you need, just like a regular 4x6 picture.
4. I then matted my picture on a piece of cardstock and adhered the picture to the card.
5. I stamped above and below the picture and on the envelope with Stupendous
“ Retro Gift Border”
6. I embellished the card with Stupendous “Class A’Peel” stickers. I used Ranger
“Stickles” in Star Dust on the envelope.
These were so much fun to make and I had more complements on these cards that any I’ve ever sent out. I hope you take this idea and make it your own, let me know how it goes.